Service Manager powered by HEAT
Working with Master Incidents
The Master Incident feature is an optional feature. If your system does not have the feature, download and import the package. See Installing the Master Incident Package.
•Linking an Incident to a Master Incident
•Unlinking an Incident from a Master Incident
•Resolving Linked Incidents from a Master Incident
•Viewing a Report of Master Incidents
•Showing or Hiding Master Incident Functions
•Installing the Master Incident Package
About Master Incidents
Ivanti Service Manager employs the concept of master incidents. A master incident is an incident that contains information common to one or more incidents. You can link multiple incidents to one master incident. When you update certain fields in a master incident, the data automatically updates in all of the linked incidents. For example, when you enter resolution details and set a master incident to resolved, all of the linked incidents are also set to resolved and the system adds the same resolution details to each of the linked incidents.
Only administrators, Service Desk Analysts, and Service Desk Managers can work with master incidents. The ability to create master incidents is available to any roles that can access the Incident workspace.
Whenever a master incident is created, the system sends an email to the Service Desk Manager, based on the ServiceDeskMgrEmailAddress global constant and the service owner, based on the email address entered for that service in the CI.Service workspace.
An incident must be specifically designated as a master incident before it appears on the master incident list. The feature is implemented by using two options on the Incident form:
•Declare as Master Incident
•Update Related Incident
Administrators can hide these options by changing their view under global constants. See Showing or Hiding Master Incident Functions for more information.
Viewing Master Incidents
1.Log into the Service Desk Console.
2.Open the Incident workspace. The system displays a list of incidents.
3.Click the down arrow next to All and then click All Saved Searches.
4.From the list of saved searches, click All Active Master Incident.
Viewing Master Incidents
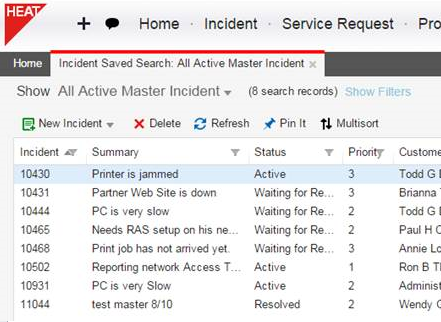
5.Double-click a master incident to see its details.
6.To see the incidents linked to the master incident, click the Related Incidents tab.
The system displays all of the incidents that are linked to the master incident.
Creating a Master Incident
1.Log into the Service Desk Console.
2.Open the Incident workspace. The system displays a list of incidents.
3.Either create a new incident as described in Creating an Incident Using a Blank Form or open an existing incident.
4.In the Impact field, select High. The system activates the Declare as Master Incident checkbox.
5.Check Declare as Master Incident.
The system does the following:
•Changes the title at the top of the form to Master Incident: incident_number (Active).
•Removes the Master Incident tab and replaces it with a Related Incident tab. Link other incidents to this Master Incident by using this tab. See To link incidents to this master incident, do the following:
•Activates the Update Related Incident checkbox.
6.Click Save to make this incident a master incident.
7.Click Update Related Incidents. After you link related incidents, this applies all changes from this master incident to the linked incidents.
8.Continue adding information as needed to the master incident.
9.To link incidents to this master incident, do the following:
| a. | Click the Related Incidents tab. |
| b. | Click Link. |
| c. | Highlight the incident to link, or shift-click more than one incident. |
| d. | Click Select. |
10.Click Save.
Linking an Incident to a Master Incident
1.Log into the Service Desk Console.
2.Open the Incident workspace. The system displays a list of incidents.
3.Open an incident.
4.In the Master Incident tab, click the link toolbar icon to display a list of all master incidents.
5.Select a master incident from the list to link this incident to the master incident.
6.Click Save.
Unlinking an Incident from a Master Incident
1.Log into the Service Desk Console.
2.Open the Incident workspace. The system displays a list of incidents.
3.Open a master incident.
4.Click the Related Incidents tab. The system displays all of the incidents that are linked to the master incident.
5.Highlight the incident to unlink and click Unlink.
6.Click Save.
Resolving Linked Incidents from a Master Incident
When you resolve a master incident, you can choose to resolve all of the incidents that are linked to it. However, if a linked incident is already resolved or closed, the system does not override those statuses.
1.Log into the Service Desk Console.
2.Open the Incident workspace. The system displays a list of incidents.
3.Open a master incident.
4.Click the Resolution Details tab.
5.Enter information in the fields, such as adding resolution notes in the Resolution field.
6.Check Update Related Incident Resolution.
7.Click Save.
The system updates the fields in the linked incidents with the values that you entered for the master incident. For the linked incidents, it also adds the text ***Resolved through master incident number*** in the Resolution field on the Resolution Details tab.
Demoting a Master Incident
When you demote a master incident to a regular (non-master) incident, the system also unlinks all of the linked incidents.
1.Log into the Service Desk Console.
2.Open the Incident workspace. The system displays a list of incidents.
3.Open a master incident.
4.From the Action Menu, click Master Incident > Demote Master Incident.
5.At the confirmation message, click Yes. The system demotes the master incident to a regular (non-master) incident.
6.Click Save.
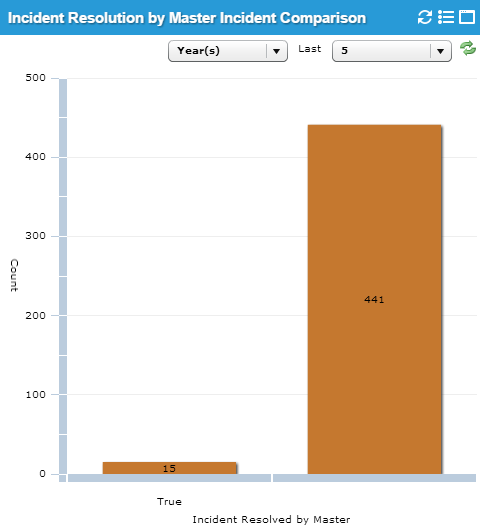
Viewing a Report of Master Incidents
Ivanti Service Manager contains a report that shows the number of incidents that were resolved by a master incident. To use the report, do the following:
1.Log into the Service Desk Console.
2.Click Dashboards > All Dashboards to bring up the list of all of the dashboards.
3.Open the Service Desk Manager dashboard. The system displays the Incident Resolution by Master Incident Comparison report on the bottom right.
4.From the Last drop-down list, select a number.
5.From the next drop-down list, select a time period, such as Hour(s) or Month(s).
6.Click the refresh icon  to update the report.
Master Incident Report
Showing or Hiding Master Incident Functions
This function is available only for Ivanti Service Manager customers using release 2016.2 or later. To display or hide Master Incident functionality as described above, do the following:
1.Log in to the application using the Administrator role, and click Configure Application
2.From the Settings panel go to Build > Global Constants.
3.Find the Show Master Incident Feature in the Name column.
4.Click in the Value column to change the setting:
•True enables and displays the Declare as Master Incident and Update Related Incident controls.
•False hides the check boxes. The Declare as Master Incident and Update Related Incident controls no longer appear on the Incident pages. The Master Incident and Related Incidents tabs are now also unavailable.
5. Click Save.
The changes will affect any role that can view the Incident Management workspace.
Installing the Master Incident Package
•About Installing the Master Incident Package
•Installing the Master Incident Package
•Updating the Role Definitions
•Updating the Service Desk Manager Dashboard
•Updating the Incident Header Form
•Updating the Incident Details Form
•Updating the Incident Resolution Form
About Installing the Master Incident Package
The Master Incident feature comes as a package. There are two package files:
•Master Incident 2015.2.MetadataPatch: For core changes such as fields, relationships, business rules, quick actions, saved searched, and dashboard parts.
•Master Incident 2015.2 UI Update.MetadataPatch: For user interface changes such as forms and layouts.
The Master Incident 2015.2 UI Update.MetadataPatch file adds additional incident forms and layouts that are designed specifically for the master incident feature. You must be on Ivanti Service Manager Release 2013.1 or later and have the FRS_Composite-Contract_Contact business object in your system.
Do not install the Master Incident 2015.2 UI Update.MetadataPatch file if:
•You are using Ivanti Service Manager Release 2012 or earlier.
•Do not have the FRS_Composite-Contract_Contact business object in your system.
•You want to retain your existing incident forms and layouts.
If you do not install this file but you want to update the incident forms and layouts, see Updating the Incident Header Form, Updating the Incident Details Form, Updating the Incident Resolution Form, and Updating the Incident Layout.
Follow these steps to install and configure the master incident feature:
Installing the Master Incident Package
1.Download the package and save it to a convenient location.
2.From the Configuration Console, click Build > HEAT Development Package > Package.
3.Click Import Package.
4.Select Validate and apply if no errors.
5.Click Browse..., find the package that you downloaded, and click Open.
Updating the Role Definitions
Follow these steps to give access to the Master Incident feature to certain user roles.
1.From the Configuration Console, click Configure > Users and Permissions > Roles and Permissions.
2.Select a role, such as admin.
3.Click the Top Level Tabs tab.
4.Click Incident.
5.For the Layout field, select IncidentLayout.ServiceDesk.
6.Click Save.
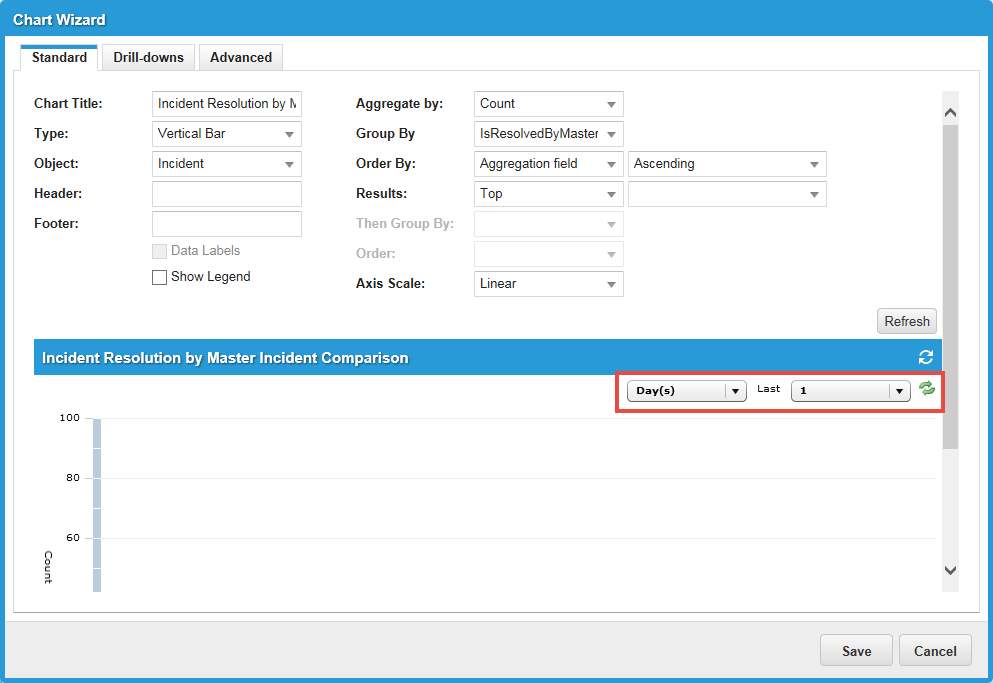
Updating the Service Desk Manager Dashboard
If you have the Master Incident feature enabled for Service Desk Managers, update the Service Desk Manager dashboard to include a dashboard part for master incident resolution. The dashboard part is included in the master incident patch files.
1.From the Configuration Console, click Build > Charts and Graphs > Dashboards.
2.Next to Service Desk Manager, click the edit  icon.
icon.
3.Under Dashboard Objects, expand the Charts section.
4.Drag the chart part called Incident Resolution by Master Incident Comparison to the right side. We recommend putting it on the right of the chart part called Top 5 Services with Active Incidents.
5.In the header of the Incident Resolution by Master Incident Comparison chart part, click the edit icon.
6.For the Last parameter, select 5 from the drop-down list.
7.For the days parameter, select Years from the drop-down list.
Master Incident Chart Part
8.Click the refresh icon to see data for the new date range.
9.Click Save to close the chart.
10.Click Save to save the dashboard.
Updating the Incident Header Form
1.From the Configuration Console, click Build > Business Objects.
2.Open the Incident business object.
3.Click the Forms tab.
4.Click IncidentHeader to open the incident header form.
5.Update the Incident label by doing the following:
| a. | In the form area on the right, click the Label field that correlates to the master incident. |
Updating the Incident Header Form
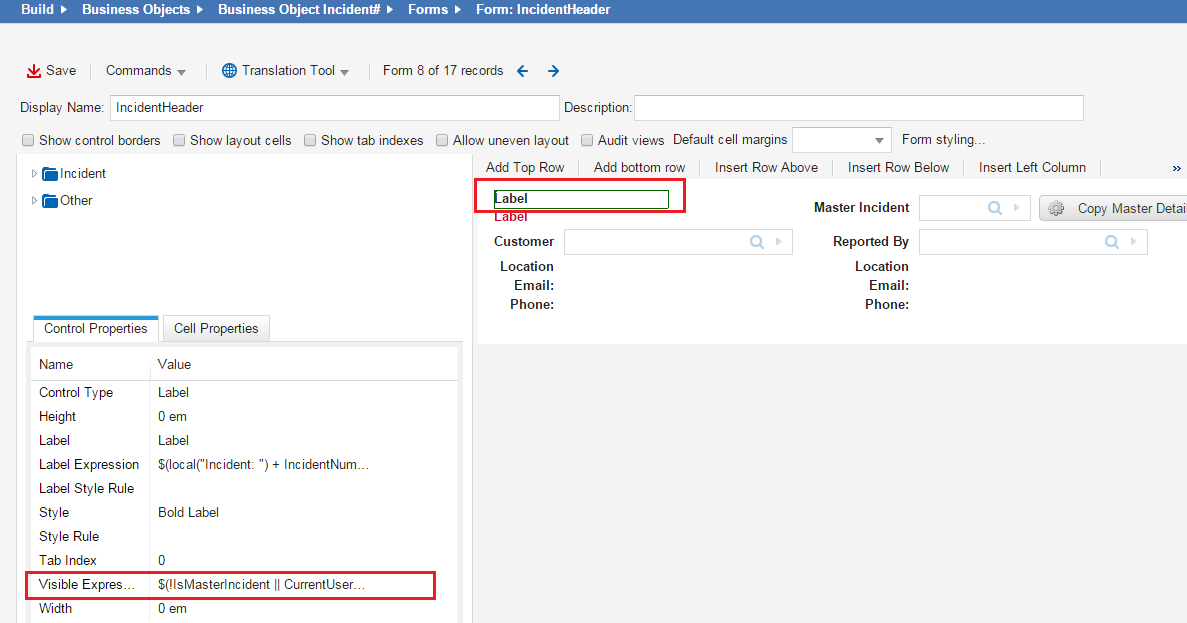
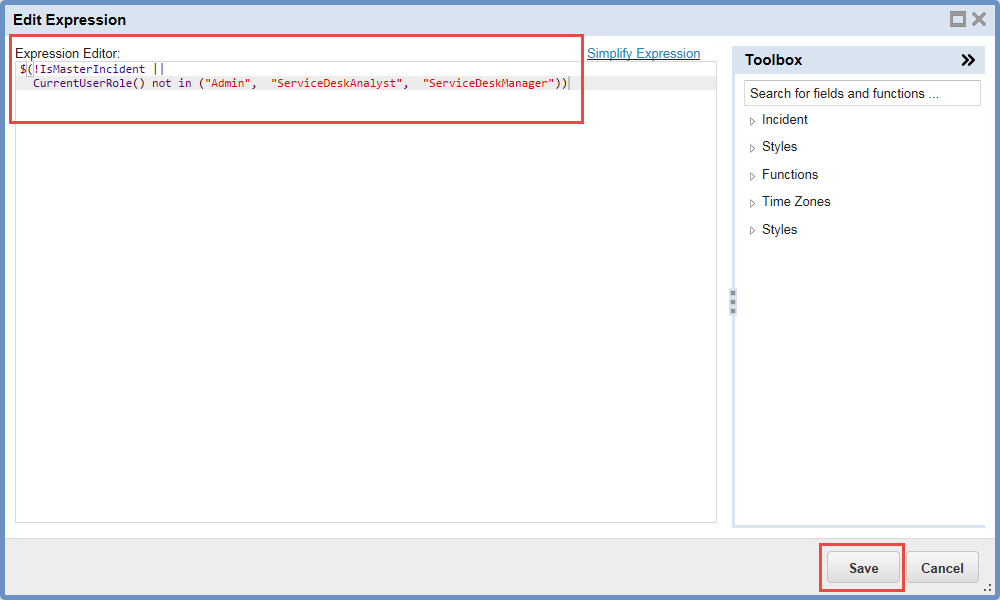
| b. | On the left, under the Control Properties tab, for the Visible Expression field, click the  icon to open the Expression Editor. icon to open the Expression Editor. |
| c. | Enter $(!IsMasterIncident ||CurrentUserRole() not in ("Admin", "ServiceDeskAnalyst", "ServiceDeskManager")) and then click Save. |
Expression Editor
6.Add a Master Incident label by doing the following:
| a. | In the top left panel, expand Other and select Label. |
| b. | Drag Label onto the form into the same cell as the existing Label fields. |
| c. | While the new Label field is highlighted, on the left, under the Control Properties tab, for the Label Expression field, click the icon to open the Expression Editor. |
| d. | Enter $(local("Master Incident: ") + IncidentNumber + " (" + local(Status) + ")") and click Save. |
| e. | For the Style field, select RedLabel from the drop-down list. |
| f. | For the Visible Expression field, click the icon to open the Expression Editor. |
| g. | Enter $(IsMasterIncident && CurrentUserRole() in ("Admin", "ServiceDeskAnalyst", "ServiceDeskManager") and click Save. |
7.Add a Master Incident Link field by doing the following:
| a. | In the top left panel, expand Incident > Fields and select MasterIncidentLink. |
| b. | Highlight the Reported By cell and click Insert Row Above. |
| c. | Drag MasterIncidentLink onto the form into the cell above the cell called Reported By. |
| d. | While the MasterIncidentLink cell is highlighted, on the left, under the Control Properties tab, for the Display Field field, enter [Incident]IncidentNumber. |
| e. | For the Label field, enter Master Incident. |
| f. | For the Visible Expression field, click the icon to open the Expression Editor. |
| g. | Enter $(if CurrentUserRole() in ("Admin", "ServiceDeskAnalyst", "ServiceDeskManager") && IsMasterIncident ||Status == "Closed" && IsNull(MasterIncidentLink_RecID) then false else true) and then click Save. |
| h. | For the Width field, enter 4. |
8.Add a Copy Master Detail button by doing the following:
| a. | In the top left panel, expand Other and select Command Button. |
| b. | Drag Command Button onto the form into the same cell as the Master Incident Link field. |
| c. | While the Button control is highlighted, on the left, under the Control Properties tab, for the Action field, click the icon to open the Action Editor. |
| d. | Under Master Incident, choose Copy Master Detail and then click OK. |
| e. | For the Label field, enter Copy Master Detail. |
| f. | For the Visible Expression field, click the icon to open the Expression Editor. |
| g. | Enter $(if CurrentUserRole() not in ("Admin", "ServiceDeskAnalyst", "ServiceDeskManager") || IsNull(MasterIncidentLink_RecID) == true || IsMasterIncident ||Status == "Closed" then false else true) and then click Save. |
| h. | For the Width field, enter 5. |
9.Add an Update Related Incidents (Service, Category, and Status) checkbox by doing the following:
| a. | In the top left panel, expand Incident > Fields and select IsRelatedIncidentUpdate. |
| b. | Drag IsRelatedIncidentUpdate onto the form into the cell next to the Copy Master Detail button. |
| c. | While the IsRelatedIncidentUpdate cell is highlighted, on the left, under the Control Properties tab, for the Label Pos field, select On the right from the drop-down list. |
| d. | For the Label field, enter Update Related Incidents (Service, Category, and Status). |
| e. | For the Visible Expression field, click the icon to open the Expression Editor. |
| f. | Enter $(if CurrentUserRole() in ("Admin", "ServiceDeskAnalyst", "ServiceDeskManager") && IsMasterIncident && Status != "Resolved" && Status != "Closed" then true else false) and then click Save. |
| g. | For the Height field, enter 1. |
10.Click Save.
Updating the Incident Details Form
1.From the Configuration Console, click Build > Business Objects.
2.Open the Incident business object.
3.Click the Forms tab.
4.Click IncidentDetails.ServiceDesk to open the incident details form for the Service Desk.
5.Add a Declare Master Incident button by doing the following:
| a. | In the top left panel, expand Other and select Command Button. |
| b. | Drag Command Button onto the form into the same cell as the Impact field. |
| c. | While the Button control is highlighted, on the left, under the Control Properties tab, for the Action field, click the icon to open the Action Editor. |
| d. | Under Master Incident, choose Declare Master Incident and click OK. |
| e. | For the Disabled Expression field, enter $(Status == "Closed"). |
| f. | For the Image field, enter badge-metal.png. |
| g. | For the Label field, enter Declare Master Incident. |
| h. | For the Visible Expression field, click the icon to open the Expression Editor. |
| i. | Enter $(if CurrentUserRole() in ("Admin", "ServiceDeskAnalyst", "ServiceDeskManager") && Impact == "High" && !IsMasterIncident && IsNull(MasterIncidentLink_RecID) then true else false) and then click Save. |
| j. | For the Width field, enter 12. |
6.Click Save.
Updating the Incident Resolution Form
1.From the Configuration Console, click Build > Business Objects.
2.Open the Incident business object.
3.Click the Forms tab.
4.Click IncidentDetails.ServiceDesk.Resolution to open the incident resolution details form for the Service Desk.
5.Add an Update Related Incidents Resolution checkbox by doing the following:
| a. | In the top left panel, expand Incident > Fields and select IsRelatedIncidentResolutionUpdate. |
| b. | Drag IsRelatedIncidentResolutionUpdate onto the form into the cell next to the Resolution cell. |
| c. | While the IsRelatedIncidentResolutionUpdate cell is highlighted, on the left, under the Control Properties tab, for the Label Pos field, select On the right from the drop-down list. |
| d. | For the Label field, enter Update Related Incident Resolution. |
| e. | For the Visible Expression field, click the icon to open the Expression Editor. |
| f. | Enter $(if CurrentUserRole() in ("Admin", "ServiceDeskAnalyst", "ServiceDeskManager") && IsMasterIncident && (!IsNull(Resolution) || Resolution == "") && Status == "Resolved" then true else false) and then click Save. |
| g. | For the Width field, enter 18. |
6.Click Save.
Updating the Incident Layout
1.From the Configuration Console, click Build > Business Objects.
2.Open the Incident business object.
3.Click the Layouts tab.
4.Click IncidentLayout.ServiceDesk to open the layout for the Service Desk.
5.Under the Views in this layout section, click formView.
6.Ensure that you are not in the Try our new look! view. If you see a link on the top right that says Switch to old view, click it.
7.Near the bottom of the page, click Add Child Panel.
8.Set the display name by doing the following:
| a. | Under the Display Name header, click <Not Set>. |
| b. | Enter Related Incidents. |
9.Assign a relationship by doing the following:
| a. | Under the Object header, click <Not Set>. |
| b. | In the FormView Child Panel Relationship Editor dialog box, select Use only direct relationship to child object(s). |
| c. | For Direct Relationship, click not set. |
| d. | Select IncidentAssocChildIncident from the drop-down list. |
| e. | Click Save. |
10.Set the list name by doing the following:
| a. | Under the List header, click <Not Set>. |
| b. | Select Incident from the drop-down list. |
11.Set the form by doing the following:
| a. | Under the Form(s) header, click <Not Set>. |
| b. | In the Form Selection dialog box, click <Not Set>. |
| c. | Select IncidentDetails.ServiceDesk from the drop-down list. |
| d. | Click OK. |
12.Set a hidden expression by doing the following:
| a. | Under the Hidden Expression header, click <Not Set>. |
| b. | In the Expression Editor, enter $(if IsMasterIncident == true then false else true). |
| c. | Click Save. |
13.Set the link button filter by doing the following:
| a. | Under the Link Button Filter header, click <Not Set>. |
| b. | In the Expression Editor, enter $(if [OtherObject]IsMasterIncident == true || [OtherObject]Status == "Closed" then false else true). |
| c. | Click Save. |
14.Check the checkbox under the Show Count in Title header.
15.Click Save.
Was this article useful?
The topic was:
Inaccurate
Incomplete
Not what I expected
Other
Copyright © 2017, Ivanti. All rights reserved.